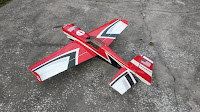
I covered so much ground on the last SHP report that there's really not much to do except post the set up pictures and talk about the plane a little bit.
Here's my new SHP that ready to go into action. I built it exactly a year to the day since I had my last surgery, without actually realizing that until my wife mentioned it. Generally I try not to build anything in July because Florida is deadly hot outside this time of year. I don't remember it being this hot last year, but then again, I was in an air conditioned hospital, so I should probably stop complaining about it and enjoy the heat!
I went for a slightly different look on this SHP. The wheel pants that come with the plane are beautiful three color paint job that matches the rest of the scheme. I can always use those later, but for now I went with the classic black Extreme Flight pant with Thunder Power decals.
Click to Enlarge
Also slightly different, but now appropriate are the Team Extreme Flight decals I had printed up. These are copies of the decals that come with the red Yak EXP, and used the just because I like them, and they do look really good.
Click to Enlarge
The spinner is a Great Planes polished aluminum but you might notice it is a lot more polished than they come out of the box. Thanks to my good friend Darnell Rodriguez for the special shine.
Flying
Ok, now I am cheating a little. This is a video I found of my last SHP. I just didn't have room for it on the last report. We hope to shoot some video as soon as we get some rain to cool things off. The Florida heat has really been unbearable this year.
Control Set Up
Generally I went with exactly what's shown in the manual. This plane has worked so well for so long for so many people that it's pretty well tweaked out. Those of us who have had this plane know it pretty well inside and out. I didn't do anything trick because I didn't need to.
Ailerons
Standard 3DHS extended arms with the pushrod adjuster in the middle hole. The inside hole is the same thing as using the outer hole on the Hitec arm that comes with the servo, which I don't think is enough. The middle hole is just right, for me, anyway.
Click to Enlarge
Rudder
Here I used an extended arm strictly for aesthetic symmetry, or in simpler terms, it matches the other side! Even using the inside hole I had to turn my end points back to about 124% to keep the servo from binding
Click to Enlarge
You may have noticed I am using the Extreme Flight tail wheel bracket. I like this unit a lot because it is easy to set up, maintain, and even replace. I can change the whole thing in about 30 seconds at the field just by turning three screws.
Here it gets a little weird because I have ball links on both ends of the elevator pushrod. I just happened to have a pushrod that was the absolute perfect length to use here. The only problem is I don't remember where it came from. It was just in my junkbox so I thought it was worth a try.
Click to Enlarge
Power System
Here's another chance to use my favorite motor, the torque 2814. You could see in the previous videos that I had plenty of power on 4 cells with a 12/6 prop, and on 3s with a big 13/6/5 or 14.7" prop. This is the motor that I stuffed into the ground when I crashed my Yak. I checked the prop shaft and it runs true, so it must have been a perfect hit!
Also on board is an Airboss 45 Elite ESC.
Click to Enlarge
Batteries
Of course I can us my Thunder Power 4s 2700 70 Pro Force packs on this plane, and it will be bad ass, but I also picked up some Thunder Power 3s 2250 55C Lightning packs. I'm flying Lightning packs in my 60" planes and am really pleased with their performance, so I have really high hopes for these packs.
These packs retail out at $36.99 which I think is pretty reasonable for a high end pack in this size. I'm going to be hammering them all summer in the SHP and the upcoming 44" Slick.
Click to Enlarge


No comments:
Post a Comment